Baked Tortilla Crisps

April 28, 2010 – 6:34 pm

These are an easy and tasty way to use up some extra tortillas. I had a few of my favorite Tortillaland tortillas that needed to be used today. I cooked them up to go with beef and bean burritos and had a couple left over. I cut those into wedges, sprayed very lightly with olive oil, sprinkled lightly with kosher salt and cumin, and baked at 425 degrees F for about 20 minutes – until nice and brown all over. Yum!

Hom Bao

April 23, 2010 – 7:14 pm

We had hom bao for dinner tonight. The pork was a little fattier than usual, I think, and it made them especially tasty. I made the dipping sauce with microplane grated ginger, which worked very nicely.

Garlic Smashed Potatoes

April 20, 2010 – 6:24 pm

These garlicky potatoes were an easy and flavorful side. I pan seared a large rib eye steak and finished it off roasting in the oven along side some brussels sprouts before carving it up. The potatoes I baked yesterday as I’d originally been planning this meal for then, before Shaun came home with stuffed up sinuses. I’ve typed it up below as though it was all done in one day – all that I did differently was warm the potatoes for a bit longer on the stove top. Shaun doesn’t like the texture of smashed and / or mashed potatoes, so these were all mine. If we’d had them yesterday, we would have just had them baked, but I knew they wouldn’t reheat well on their own, so I punted with this recipe. I’m glad it turned out well 🙂

Garlic Smashed Potatoes
Serves 4

4 medium white rose potatoes (about 2 lbs)
2 tbsp butter
2 cloves garlic, pressed

Preheat the oven to 400 degrees F.

Wrap each potato in aluminum foil and bake for 1-1.5 hours or until fork tender. Remove from the oven. In a saucepan, melt the butter and add the potatoes and garlic. Use a potato masher to squish the potatoes into chunky bits – there should still be quite a bit of texture, but no chunks bigger than a grape. Stir to toss well with the butter and garlic. Serve hot.

Chile Roasted Pork

April 19, 2010 – 4:52 pm

This is a spicy Mexican inspired pork that I whipped up after Shaun requested something spicy to help clear his sinuses. The rub turned out quite well and I’ll definitely use it again. It does have a kick to it, so reduce the cayenne if you’d like it milder.

Chile Roasted Pork
Serves 4

1.5 lb pork sirloin roast, cut into 1 inch chunks
1 tsp kosher salt
1 tsp black pepper
1/4 tsp garlic powder
1/4 tsp onion powder
1/4 tsp cayenne pepper
1 small anaheim or hatch chile, seeded and diced

Preheat the oven to 425 degrees F.

Toss the pork with the rest of the ingredients. Spread on a baking sheet lined with foil and sprayed with non-stick spray. Roast for 20-25 minutes or until nicely browned and internal temperature is 160 degrees F.

Serve with tortillas and beans.

Bibimbap (Korean Mixed Rice Bowls)

April 17, 2010 – 5:41 pm

This is a Korean dish that is very versatile. The name literally means “mixed rice.” I make mine with galbi marinated thinly sliced beef; stir fried zucchini, carrots, and cabbage; and a fried egg. Kimchi is more traditional, but I’m not much of a fan, so the stir fried cabbage works as a good compromise. Bean sprouts are also quite traditional, but they looked lousy today, so no. Part of the appeal to bibimbap, apart from the simple fun of saying it “bee-bihm-bahp” “bee-bihm-bahp” 🙂 , is that it’s very easy to customize. All of the ingredients are stir fried separately, so if a guest doesn’t like carrots, he simply doesn’t put any in his bowl.
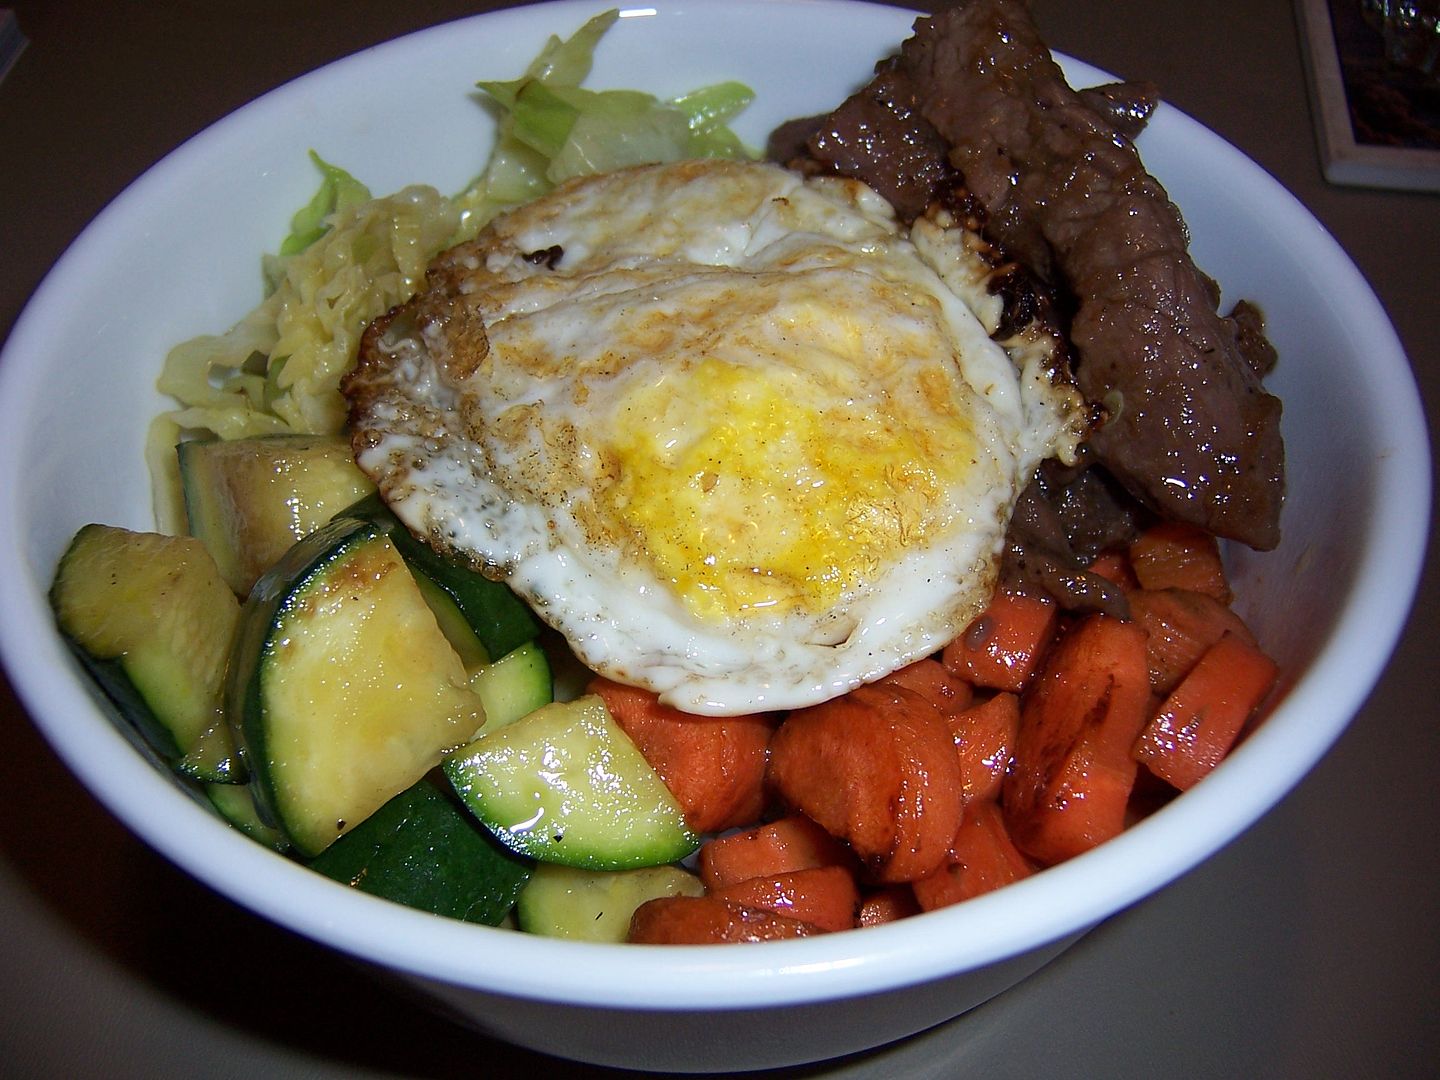
Bibimbap
Serves 4

For the beef:
12 oz thinly sliced beef
4 large cloves garlic, pressed (about 4 tablespoons)
¼ cup soy sauce
2 tbsp sugar
1 tbsp honey
½ of a ripe bartlett pear, cored and grated
2 tbsp sake
1 tbsp sesame oil
1 tsp black pepper

For the vegetables:
2 medium small zucchini, quartered lengthwise then sliced
2 medium small carrots, halved lengthwise then sliced
½ small savoy cabbage, sliced
canola oil
sesame oil

For the egg:
4 eggs
1 tsp canola oil

For serving:
8 cups hot cooked medium grain rice
gochujang or sriracha (hot sauce) to taste

Mix together all the beef marinade ingredients in a large zip top bag. Add the beef and seal. Refrigerate for 2 hours.

Cook the rice according to your favorite method or just the method on the package.

When the rice is just about done, heat 1 tbsp of canola oil in a large skillet or wok over medium high heat. Add the beef and cook until just browned. Remove to a bowl and cover to keep warm.

Add about 2 tsp of canola oil and 1 tsp of sesame oil to the pan and add the carrots. Cook for 3-4 minutes, or until crisp-tender. Remove to a bowl and keep warm. Add a bit more of the oils if necessary, then add the zucchini and cook for another 3-4 minutes, until tender, and remove to a bowl. Finally add the cabbage, cook for 1-2 minutes to brown a bit, then add a splash of water and cover and cook for a final 1-2 minutes or until tender as well. Remove to a bowl and keep warm.

Add a little more canola oil to the pan and fry the eggs to your desired doneness – a little runnyness is traditional, but hard set is just fine.

Scoop rice into bowls, arrange some beef and veggies of your choice around the edges, and place a fried egg in the middle. Serve immediately. Diners should add hot sauce to taste and mix everything together into a tasty mish-mash.

Vegetable Miso Soup

April 15, 2010 – 6:56 pm

A very easy quick soup as long as you have access to a couple ingredients that you may or may not be able to find in your local grocery store. I get these either at H Mart or Central Market, though I do regularly see wakame in the Asian aisles of my regular supermarkets. Any mushrooms will do just fine, I just like the shape and texture of the bunashimeji. Adding tofu to this would be good too.

Vegetable Miso Soup
Serves 4 for an appetizer

4 cups water
4 tablespoons miso paste (I like Miko Brand Dashi Miso)
1 tsp cut wakame (seaweed)
3-4 oz fresh mushrooms, washed and sliced if necessary (I used some bunashimeji, aka brown beech mushrooms, distributed by Hokto Kinoko)

Place the water and mushrooms in a 2 quart pot and bring to a boil. Stir in the miso paste and wakame and stir gently. Turn the heat to low and let simmer for 2-3 minutes. Serve hot.

Citrus Grilled Chicken

April 13, 2010 – 5:41 pm

This is a really tasty Mexican inspired chicken that matches well with corn tortillas. I’ve blogged about it before. I served this with refried beans and guacamole. I was planning on grilling tonight, but we ran out of propane before I even got it preheated. The broiler works almost as well, though, and the cooking times are much the same. Just move a rack about 8 inches below the heating element and set it on the low broil setting, or about 14 inches away if you only have a high setting, and reverse the instructions for turning, as your heat source is above instead of below.

Citrus Grilled Chicken
Serves 4

For the marinade:
6 ounces (1 small can) pineapple juice
2 tbsp freshly squeezed lime juice
1 tbsp white vinegar
2 large cloves garlic, pressed
½ tsp salt
½ tsp dried Mexican oregano
½ tsp ground pepper
½ tsp turmeric
1 tsp ground cumin
1 teaspoon minced mild chili pepper (I used a Hatch)
1 tablespoon vegetable oil

For the rest:
4 pounds chicken thighs (with skin and bone)

Remove stem and seeds from chile and finely mince about a teaspoon. Save the remainder of the chile whole to throw on the grill with the chicken.

In large zip top bag, combine all ingredients except chicken.

Place chicken in the bag, seal, pressing all of the air out, and squish around to coat the chicken well. Refrigerate overnight, turning once.

Remove chicken from refrigerator 45 minutes before you’d like to start grilling and preheat the grill to medium heat. Drain chicken well. Turn the grill to low heat. Starting skin side up, grill over low heat for 12-15 minutes, until the skin starts to look dry and the chicken is firm. Turn the chicken skin side down and cook for another 12-15 minutes, when juices are pooling in the hollows of the chicken pieces. Turn again (skin side up again) and cook until the internal temperature reaches 170 degrees F, about another 5 minutes. Turn once more skin side down, increase the heat to medium and cook for a final 5 minutes or until the internal temperature reaches 180 degrees F and the skin is crisp and browned. Keep a close eye on the chicken as it cooks and put out any flare-ups immediately to avoid burning the meat.

Serve with beans and corn tortillas.

First grilled steaks of the season

April 11, 2010 – 5:51 pm

We warmed up the grill for the first time this year, and celebrated with some nice little steaks, baked potatoes, and green salad. A nice meal to enjoy the warmer weather!

Happy Birthday Emma!

April 10, 2010 – 4:05 pm

Emma turned two today. We went to the pet store to celebrate. She got a few treats, lots of dogs to meet and greet, and got to pick out a new little squeeky toy to eviscerate. After all that hard play and a frosty paws, time for nosing under the blanket for a nap 🙂


Broiled Oysters with Sun Dried Tomato Tapenade

April 9, 2010 – 3:39 pm

These are inspired by an appetizer I had at Anthony’s in Everett for our anniversary dinner back on March 25th. I got a raw oyster sampler and a pair of “barbecue oysters” that were both just wonderful. The oyster sampler was so much fun. I got to try half a dozen different locally farmed oysters and really got a feel for how the type of oyster and the waters they grow in affect the flavor. My favorites were the Olympia (the only oyster native to the northwest) and the Chelsea Gem, a Pacific oyster. The barbecue oysters were a hit with me too – they were broiled with some sun dried tomatoes and cheese. This is my version of the dish. I bought a dozen local Quilcene oysters, ate 4 raw, and ate the others cooked as below. These would be great on the grill as well!


Broiled Oysters with Sun Dried Tomato Tapenade
Serves 2 as an appetizer

6 fresh oysters in the shell
2 oz sun dried tomatoes packed in seasoned oil (I like Mezzetta, with garlic, oregano, and basil), chopped into a tapenade
1 tbsp grated Parmesan cheese

Preheat the broiler to high heat.

Place the oysters deep side down on a rimmed baking sheet and place under the broiler. Cook for 3-4 minutes or until they just start to open. Using a thick oven mitt, an oyster knife, and great care, remove the top shells from the oysters and sever the muscle holding the oyster in the shell, being careful to spill as little of the liquor as possible. Spoon a little of the tomato tapenade onto each oyster, sprinkle with Parmesan, and return under the broiler. Cook for another minute or until the tapenade is warm and the cheese is melted.